EPOXY FLOORING SYSTEM FOR – ESD-CONTROLLED CLEANROOM ENVIRONMENTS
Introduction
Cleanroom environments demand extremely precise electrostatic discharge (ESD) control to protect sensitive equipment, maintain contamination-free conditions, and ensure uninterrupted performance of precision operations. Even a minor electrostatic imbalance can result in component failure, data corruption, or product rejection.
The Epoxy Flooring System for ESD-Controlled Cleanroom Environments by Ressichem provides a highly conductive, seamless, and durable epoxy floor system specifically engineered for cleanroom-grade environments. It ensures controlled and uniform static dissipation, in coordination with grounding networks, while maintaining a smooth, hygienic, and low-particle-emitting surface.
Recommended Use Cases
- Semiconductor and microchip manufacturing
- Pharmaceutical cleanrooms
- Medical device production facilities
- Precision laboratories and calibration zones
- Aerospace and defense electronics assembly
- Research & development centers with controlled ESD
Step-Wise System Description
Step 1: Surface Preparation
Proper substrate evaluation and preparation are critical to ensure uniform grounding and long-term ESD performance.
- All necessary surface repairs, including crack filling or substrate restoration, must be completed prior to the application of any epoxy flooring materials.
- The concrete strength requirement must be defined by the project consultant as per the operational load profile.
- Perform both destructive (core sample) and non-destructive Schmidt Hammer strength testing to verify substrate integrity.
- For major repairs ≥ 12 mm, apply Ressi NSG 710, a high-strength, non-shrink cementitious repair mortar.
- For minor imperfections, use Ressi EPO Primer LV blended with Ressichem’s washed, graded, and completely dried silica sand to form a moisture-free repair paste.
- Mechanically prepare the substrate through shot blasting or diamond grinding to ensure an oil-free, dust-free surface.
- In previously used floors, ensure full removal of oil or grease contamination before application.
Step 2: Application of Ressi SLS Primer – 1 and Ressi SLS 610 (If Required)
- If leveling is required to achieve a uniform substrate before epoxy application, apply Ressi SLS Primer – 1 followed by Ressi SLS 610, a self-leveling cementitious floor screed.
- Allow 7–14 days for the screed to release moisture depending on ambient temperature and humidity before proceeding with epoxy installation.
- Ensure moisture level < 5% before further coating.
Step 3: Application of Ressi EPO Primer LV and Copper Strip Installation
- Apply Ressi EPO Primer LV, a low-viscosity, solvent-free epoxy primer that promotes bonding and surface sealing.
- During this stage, the copper grounding network is integrated into the flooring system.
- Copper strips are bonded using Ressi EPO Primer LV over the prepared surface.
- The spacing, width, and thickness of the copper strips are to be determined according to the client’s ESD requirement.
- Once installed, the continuity and discharge capacity of the grounding system should be tested and verified before applying the conductive topcoat.
- This ensures that the entire copper grid forms a consistent and functional discharge path across the floor area.
Step 4: Application of Ressi EPO Anti-Static
- Apply Ressi EPO Anti-Static, a conductive epoxy topcoat that ensures seamless conductivity across the surface and effective connection to the copper grounding system.
- Apply the material at a minimum thickness of 1000 microns above the height of the copper strip layout.
- For example: if the copper strip thickness is 1000 microns, the total topcoat thickness should be 2000 microns.
- Apply using a notched trowel or epoxy squeegee, followed by back rolling to achieve a uniform finish.
- Allow the coating to fully cure before conducting ESD validation.
Step 5: Floor Markings (If Required)
- For cleanroom demarcations, apply Ressi EPO Anti-Static in a contrasting color using a roller at a thin coat thickness.
- This ensures that the visual layout complements the conductive flooring while maintaining its electrical continuity.
System Advantages
- Seamless ESD Control: Maintains consistent conductivity across the entire cleanroom floor area.
- High Cleanroom Compatibility: Smooth, dust-free, and low-particulate surface.
- Chemical Resistance: Withstands common cleaning and sterilization agents.
- Durability: Designed for heavy-duty cleanroom equipment and wheeled traffic.
- Hygienic Surface: Non-porous and easy to clean, maintaining GMP compliance.
- Grounded Safety: Provides reliable discharge pathways via copper strip integration.
- Customizable Finish: Available in cleanroom-appropriate colors and gloss levels.
Maintenance Guidelines
- Use only neutral pH cleaners to maintain coating integrity and conductivity.
- Avoid applying insulating waxes or sealers over the ESD surface.
- Inspect grounding points periodically for continuity.
- Periodic re-coating may be required to restore finish and maintain ESD consistency.
- Keep the cleanroom climate controlled to ensure consistent ESD performance.
System Summary Table
| Parameter | Description |
|---|
| System Name | Epoxy Flooring System for – ESD-Controlled Cleanroom Environments |
| Area Type | Specialized / High-Performance – Cleanroom & ESD-Controlled Facilities |
| Traffic Exposure | Light to Heavy (as per cleanroom equipment) |
| Primary Requirements | Controlled ESD Discharge and Grounding Integration |
| Primer (Optional) | Ressi SLS Primer – 1 (for SLS systems) |
| Leveling Layer (Compulsory) | Ressi SLS 610 (if required) |
| Epoxy Primer | Ressi EPO Primer LV (used for both priming and copper bonding) |
| Conductive Layer | Ressi EPO Anti-Static (≥ 1000 microns above copper layout) |
| Silica Used | Washed, graded, and completely dried (zero moisture content) silica sand |
| Copper Grid Network | Installed and grounded as per site-specific ESD requirements |
| Application Method | High-Build Trowel or Epoxy Squeegee |
| Finish Type | Smooth, Low-Gloss / Semi-Gloss Conductive Finish |
| Curing Time Before Use | 48–72 Hours (Light Access) / 7 Days (Full Cure) |
| Key Benefits | ESD Control, Durability, GMP Hygiene, Grounding Integration |
Conclusion
The Epoxy Flooring System for ESD-Controlled Cleanroom Environments by Ressichem is a precision-engineered conductive epoxy system that integrates copper grounding with anti-static technology for complete electrostatic discharge management.
The combination of Ressi EPO Primer LV, embedded copper grid, and Ressi EPO Anti-Static creates a robust, hygienic, and reliable flooring solution tailored for pharmaceutical, semiconductor, and medical cleanroom environments.
System Summary
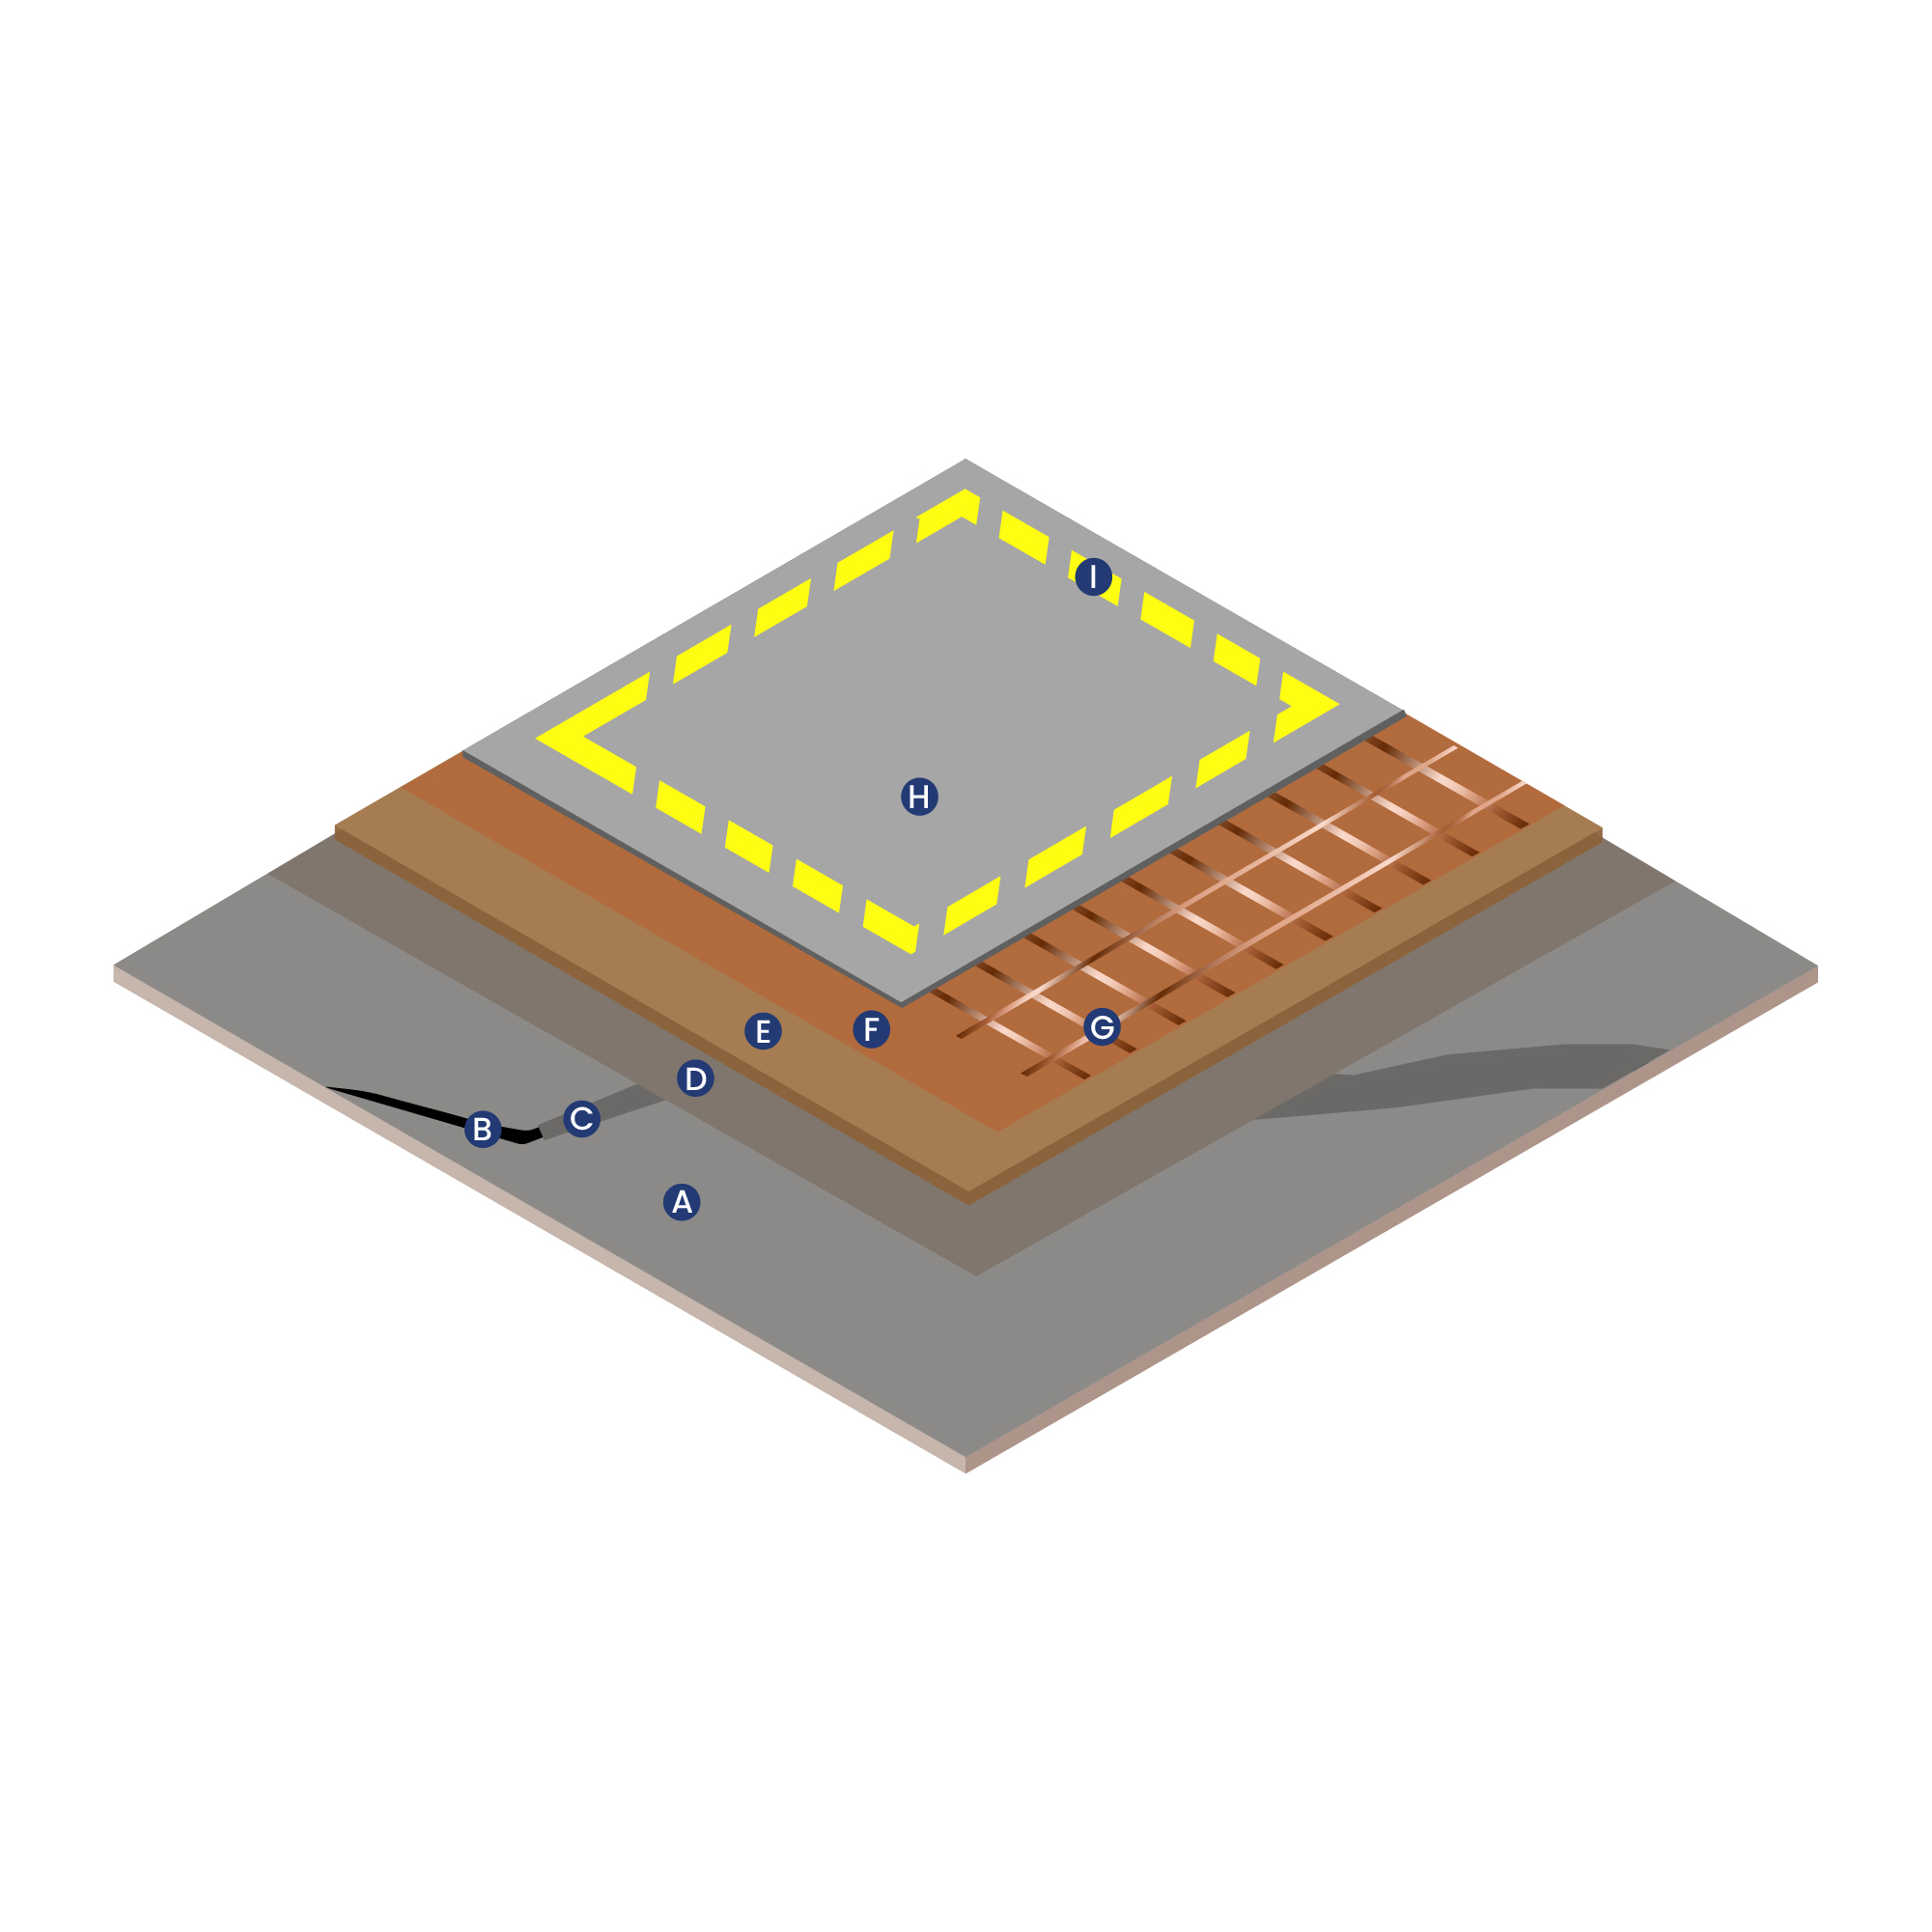
A Cementitious Surface: (Concrete slab or screed)
B Cracks and surface damage
C Crack Filler and Repairing Materials
D Ressi SLS Primer – 1
E Ressi SLS 610
F Ressi EPO Primer LV
G Copper Strips
H Ressi EPO Anti-Static
I Ressi EPO Anti-Static (Marking)